Face Recognition in Videos (or turning videofacerec.py into something useful)
videofacerec is a tiny Python script I wrote to perform face recognition in videos and to showcase some features of the facerec framework. Many people kept asking for it recently, so I’ve finally decided to rewrite it into something more useful and robust. And this is also the perfect chance to add some more features and write a new blog post.
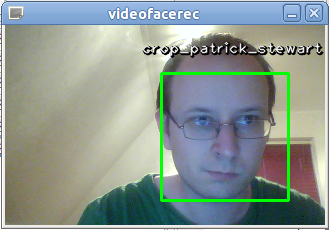
A screenshot of the final application.
The screenshot shows you the final applications output, with my beautiful face of course. I’ve trained a model with the images of some celebrities and the application recognizes me as the terrific Sir Patrick Stewart, which makes perfect sense if you have read my article on the Fisherfaces algorithm.
You can find the script and resources at:
usage
The old script was hard to use and since the new one is easy to use I’ve called it simple_videofacerec.py. Basically the script allows you to compute, save and load models for face recognition in videos (e.g. webcam feeds). Moreover you can optionally validate your model to see the performance you can expect. OpenCV, which is a great Open Source project, is used for the face detection part and you can use all the available cascades coming with OpenCV for face detection.
Here is the usage and help message you get by calling simple_videofacerec.py -h:
philipp@mango:~/github/facerec/py/apps/videofacerec$ ./simple_videofacerec.py -h
Usage: simple_videofacerec.py [options] model_filename

Options:
  -h, --help            show this help message and exit
  -r SIZE, --resize=SIZE
                        Resizes the given dataset to a given size in format
                        [width]x[height] (default: 100x100).
  -v NUMFOLDS, --validate=NUMFOLDS
                        Performs a k-fold cross validation on the dataset, if
                        given (default: None).
  -t DATASET, --train=DATASET
                        Trains the model on the given dataset.
  -i CAMERA_ID, --id=CAMERA_ID
                        Sets the Camera Id to be used (default: 0).
  -c CASCADE_FILENAME, --cascade=CASCADE_FILENAME
                        Sets the path to the Haar Cascade used for the face
                        detection part (default:
                        haarcascade_frontalface_alt2.xml).
As you can see, the name for the recognition model (called model_filename above) is required. I don’t think everything in the help message is self-explaining, so here is an in-depth summary:
- -r SIZE, --resize=SIZE
- Some of the algorithms I have implemented in the framework only work on images with the same dimension. So if you learn a model, you probably need to resize the images to equal length. Moreover the images used in the prediction need to be resized to the training sets size, else the whole thing crashes with cryptic error messages. In the script you can pass the size with the -r or --resize switch and the size in format [width]x[height], so valid arguments are for example 70x70 or 130x100.
- Example: python simple_videofacerec.py -t /path/to/some/dataset -r 130x100 model_filename.pkl
- -v NUMFOLDS, --validate=NUMFOLDS
- You really want to validate a model before using it, so you are able to estimate the performance you can expect from it. The script only supports a simple k-Fold Cross Validation and outputs the <i>precision</i> of the model. If you want to use other estimates I suggest reading <a href=”http://bytefish.de/blog/validating_algorithms/“>my post on validating algorithms</a>, which uses the great scikit-learn project. The following example performs a 10-fold Cross Validation on a given dataset and stores the computed model to model_filename.pkl.
- Example: python simple_videofacerec.py -t /path/to/some/dataset -v 10 model_filename.pkl
- -t DATASET, --train=DATASET
*For performing face recognition, you’ll need to learn a model first. This is done by passing the -t or --train parameter and the path to a dataset to the script (you’ve seen this above already). The script has a method get_model, which defines the PredictableModel (please see the <a href=”https://github.com/bytefish/facerec/blob/master/README.markdown“>README</a> of facerec for full examples and explanation. The following example reads the dataset from /path/to/your/dataset and stores it to model_filename.pkl * Example: python simple_videofacerec.py -t /path/to/your/dataset model_filename.pkl
- -i CAMERA_ID, --id=CAMERA_ID
- OpenCV assigns a number to each of your devices, starting with 0 (used per default). So if you have multiple cameras and want to use another one, the -i or --id switch is the way to go! The following example uses the camera with id 1 and model_filename.pkl for recognition.
- Example: python simple_videofacerec.py -c 1 model_filename.pkl
- -c CASCADE_FILENAME
- The OpenCV library includes <a href=”http://docs.opencv.org/modules/objdetect/doc/cascade_classification.html“>Cascade Classification</a> for object recognition, which can be used for realtime face detection. We are going to use the OpenCV Python bindings to <a href=”http://docs.opencv.org/modules/objdetect/doc/cascade_classification.html“>cv::CascadeClassifier</a> for the face detection part of the application. You can find all available cascades in the <a href=”https://github.com/Itseez/opencv/tree/master/data“>data folder of your OpenCV installation</a>. I’ve added a Cascaded to the repository, you probably want to experiment with other ones. The following examples uses the model in model_filename.pkl for recognition and the cascade in haarcascade_frontalface_alt2.xml for face detection.
- Example: python -c haarcascade_frontalface_alt2.xml model_filename.pkl
working with the script
getting the image data right
All of my recent tutorials include the same part, that explains how to prepare the image data for my scripts. It’s not because I love repeating myself, but because readers almost always ask this question, so I am copy and pasting it to avoid the confusion. For sake of simplicity I have assumed in the script, that the images (the faces, the persons you want to recognize) are given in folders. One folder per person. So imagine I have a folder (a dataset) called celebrities with the subfolders tom_hanks, philipp_wagner, angelina_jolie and so on.
The folder (stored at ~/facerec/data/celebrities in this example) will look like this
- ::
- philipp@mango:~/facerec/data/celebrities$ tree -L 2 . |– tom_hanks | |– 1.jpg | |– 2.jpg | |– 3.jpg | |– 4.jpg ... |– philipp_wagner | |– 1.jpg | |– 2.jpg | |– 3.jpg | |– 4.jpg ... |– angelina_jolie | |– 1.jpg | |– 2.jpg | |– 3.jpg | |– 4.jpg [...]
If you pass a dataset with a similar hierarchie to simple_videofacerec.py, it is able to read the images and use the folder names for identification.
learning and validating a model
Imagine I have prepared some images of celebrities and stored them in /home/philipp/facerec/data/celebrities, of course in the hierarchie as described above. The images are all aligned at the eyes, as most of the algorithms need aligned images to learn a good model, similar to my set of George Clooney images (he was so amazing in Batman & Robin!):

Initially you don’t have a computed mode to perform the face recognition yet. This predicition model has to be trained on the set of images we’ve prepared. This is done by passing the -t or --train parameter, the path to our dataset (/home/philipp/facerec/data/celebrities) and the model filename (e.g. ``my_model.pkl) to the script. So you would start the script with the following call:
python simple_videofacerec.py -t /home/philipp/facerec/data/celebrities my_model.pkl
If you run the script, you’ll see an output similar to this:
- ::
philipp@mango:~/github/facerec/py/apps/videofacerec$ python simple_videofacerec.py -t /home/philipp/facerec/data/celebrities my_model.pkl
Press [ESC] to exit the program! Script output: Loading dataset... Computing the model... Saving the model... Starting application...
This line (1) reads the image data in the given folder, (2) computes the model, (3) saves the model to my_model.pkl and finally starts grabbing images from the webcam. And you can see, that Python serializes you the learnt model to disk:
philipp@mango:~/github/facerec/py/apps/videofacerec$ du -sh my_model.pkl
2.0M    my_model.pkl
You can easily reuse the model and don’t need to learn it from the dataset all over again. This can be done by simply don’t passing the -t or --train parameter, but only passing the model filename:
python simple_videofacerec.py my_model.pkl
And the script output is much shorter:
philipp@mango:~/github/facerec/py/apps/videofacerec$ python simple_videofacerec.py my_model.pkl

Press [ESC] to exit the program!
Script output:
Loading the model...
Starting application...
validating the model
Sometimes you want to know, which performance to expect from the model given the data available. The script optionally performs a k-Fold Cross Validation to estimate the precision of the model. This is done by passing the -v or --validate switch with the number of folds as parameter. The validation is ignored, if it is not used with the -t or --train switch:
python simple_videofacerec.py -t /home/philipp/facerec/data/celebrities -v 10 my_model.pkl
The scripts output then includes some log output and prints the cross validation result:
philipp@mango:~/github/facerec/py/apps/videofacerec$ python simple_videofacerec.py -t /home/philipp/facerec/data/celebrities -v 10 my_model.pkl

Usage: simple_videofacerec.py [options] model_filename

Press [ESC] to exit the program!
Script output:
Loading dataset...
Validating model with 10 folds...
2013-06-17 23:18:40,873 - facerec.validation.KFoldCrossValidation - INFO - Processing fold 1/10.
2013-06-17 23:18:42,218 - facerec.validation.KFoldCrossValidation - INFO - Processing fold 2/10.
2013-06-17 23:18:43,561 - facerec.validation.KFoldCrossValidation - INFO - Processing fold 3/10.
2013-06-17 23:18:44,895 - facerec.validation.KFoldCrossValidation - INFO - Processing fold 4/10.
2013-06-17 23:18:46,269 - facerec.validation.KFoldCrossValidation - INFO - Processing fold 5/10.
2013-06-17 23:18:47,605 - facerec.validation.KFoldCrossValidation - INFO - Processing fold 6/10.
2013-06-17 23:18:48,976 - facerec.validation.KFoldCrossValidation - INFO - Processing fold 7/10.
2013-06-17 23:18:50,336 - facerec.validation.KFoldCrossValidation - INFO - Processing fold 8/10.
2013-06-17 23:18:51,694 - facerec.validation.KFoldCrossValidation - INFO - Processing fold 9/10.
2013-06-17 23:18:53,048 - facerec.validation.KFoldCrossValidation - INFO - Processing fold 10/10.
k-Fold Cross Validation (model=PredictableModel (feature=Fisherfaces (num_components=9), classifier=NearestNeighbor (k=1, dist_metric=EuclideanDistance)), k=10, runs=1, accuracy=96.00%, std(accuracy)=0.00%, tp=96, fp=4, tn=0, fn=0)
Computing the model...
Saving the model...
Starting application...
defining your own model
If you are experimenting with the framework, you probably don’t want to stick to the Fisherfaces algorithm used as default. Instead of coming up with an own language for defining a model or using a XML configuration (please not!), there’s simply a method which returns the model definition. Sometimes a method is totally sufficient in programming:
def get_model(image_size, subject_names):
    """ This method returns the PredictableModel which is used to learn a model
        for possible further usage. If you want to define your own model, this
        is the method to return it from!
    """
    # Define the Fisherfaces Method as Feature Extraction method:
    feature = Fisherfaces()
    # Define a 1-NN classifier with Euclidean Distance:
    classifier = NearestNeighbor(dist_metric=EuclideanDistance(), k=1)
    # Return the model as the combination:
    return ExtendedPredictableModel(feature=feature, classifier=classifier, image_size=image_size, subject_names=subject_names)
So if you want to define your own algorithms, this is place to overwrite. You need to return an ExtendedPredictableModel for the script to work (ExtendedPredictableModel is defined in the script).
conclusion
This was my first blog post for a long time, and I hope you had as much fun reading it as I had writing it. If there’s anything you’d like to see in the script, then let me know and I’ll be happy to add it. Before you comment below and ask about the recognition performance of the implemented algorithms: they do not work perfect on not preprocessed input images. In order to create a more robust recognition, your input images should be aligned in the same manner as we did for the training set.