Providing Multitenancy with Spring Boot and Jersey
In this post I will show you how to provide multitenancy in a Spring Boot application.
What Is Multitenancy
As soon as your application has multiple customers you will need to implement some kind of multitenancy for your application.
Microsoft writes on multitenant applications:
A multitenant application is a shared resource that allows separate users, or "tenants," to view the application as though it was their own. A typical scenario that lends itself to a multitenant application is one in which all users of the application may wish to customize the user experience but otherwise have the same basic business requirements.
The best introduction to multitenant applications I have found is written by Microsoft at:
Multitenant Models
There are several models to achieve multitenancy in an application:
- Database per Tenant
- Each Tenant has its own database and is isolated from other tenants.
- Shared database, Separate Schema
- All Tenants share a database, but have their own database schemas and their own tables.
- Shared Database, Shared Schema
- All Tenants share a database and tables. Every table has a Column with the Tenant Identifier, that shows the owner of the row.
Think about it like this (taken from StackExchange Software Engineering):
- Database per Tenant: Every Tenant has its own house.
- Shared Database, Separate Schema: Every Tenant in the same building, but has its own apartment.
- Shared Database, Shared Schema: Everyone is living in the same apartment and all stuff is marked with sticky-notes to show who owns it.
Every model is a trade-off between isolation and resource sharing, which is explained in detail at:
I personally always opt for the Database-per-Tenant approach, because it provides the greatest data isolation between Tenants and is by far the simplest model to implement.
Spring Boot Example
The GitHub repository for this post can be found at:
In this example we are going to develop a multitenant application to manage the clients of tenants.
Creating the Databases
First of all we need to create a database user and the tenant databases for this tutorial. I am going to use PostgreSQL for this
example. We are going to have two tenants TenantOne with the database sampledb and a tenant TenantTwo with the
datbase sampledb2.
First of all create the user philipp for connecting to the databases:
PS C:\Users\philipp> psql -U postgres
psql (9.4.1)
postgres=# CREATE USER philipp WITH PASSWORD 'test_pwd';
CREATE ROLE
Then we can create the two tenant databases and set the owner to philipp:
postgres=# CREATE DATABASE sampledb
postgres-#   WITH OWNER philipp;
CREATE DATABASE
postgres=#
postgres=# CREATE DATABASE sampledb2
postgres-#   WITH OWNER philipp;
CREATE DATABASE
Creating the Schema and Tables
The GitHub sample has a Batch Script (Windows users) and a Shell Script (Mac / Linux Users) to create the schemas and tables:
You simply need to exectute the script and enter the database name and credentials details.
Execute the script for both tenant databases sampledb and sampledb2 to setup the databases.
If however you prefer to do this manually, the next sections will show the schema and table definitions.
SQL Schema
IF NOT EXISTS (SELECT 1 FROM information_schema.schemata WHERE schema_name = 'sample') THEN

    CREATE SCHEMA sample;

END IF;
SQL Table
IF NOT EXISTS (
    SELECT 1
    FROM information_schema.tables
    WHERE  table_schema = 'sample'
    AND table_name = 'customer'
) THEN

CREATE TABLE sample.customer
(
    customer_id SERIAL PRIMARY KEY,
    first_name VARCHAR(255) NOT NULL,
    last_name VARCHAR(255) NOT NULL
);

END IF;
Project Structure
It's useful to take a look at the Project structure first:
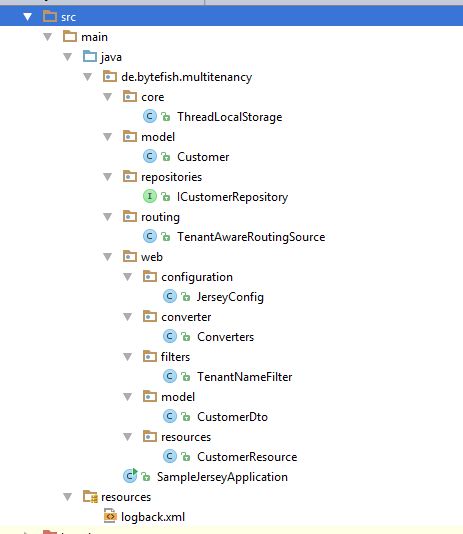
The purpose of the various classes:
coreThreadLocalStorage- Stores the Tenant Identifier in a
ThreadLocal.
- Stores the Tenant Identifier in a
modelCustomer- The
Customerentity, which will be managed in each Tenant Database.
- The
repositoriesICustomerRepository- A CRUD Repository to persist customers.
routingTenantAwareRoutingSource- Uses the Tenant Identifier to identify the database of this tenant.
webconfigurationJerseyConfiguration* Configures Jersey Filters and Resources.
converterConverters- Converts between the Domain Model and the Data Transfer Object.
filtersTenantNameFilter- Extracts the Tenant Identifier from an incoming request.
resourcesCustomerResource- Implements a REST Webservice for persisting and deleting Customers.
Infrastructure
Storing Tenant Identifier
The ThreadLocalStorage class wraps a ThreadLocal to store the Tenant data in the current thread context.
// Copyright (c) Philipp Wagner. All rights reserved.
// Licensed under the MIT license. See LICENSE file in the project root for full license information.

package de.bytefish.multitenancy.core;

public class ThreadLocalStorage {

    private static ThreadLocal<String> tenant = new ThreadLocal<>();

    public static void setTenantName(String tenantName) {
        tenant.set(tenantName);
    }

    public static String getTenantName() {
        return tenant.get();
    }

}
Implement the Routing
Spring Boot provides the AbstractRoutingDataSource for determining a data source at runtime. In the example
the tenant name from the ThreadLocalStorage is used as the lookup key for routing. We will later see how it
is used in the Spring Boot application.
// Copyright (c) Philipp Wagner. All rights reserved.
// Licensed under the MIT license. See LICENSE file in the project root for full license information.

package de.bytefish.multitenancy.routing;

import de.bytefish.multitenancy.core.ThreadLocalStorage;
import org.springframework.jdbc.datasource.lookup.AbstractRoutingDataSource;

public class TenantAwareRoutingSource extends AbstractRoutingDataSource {

    @Override
    protected Object determineCurrentLookupKey() {
        return ThreadLocalStorage.getTenantName();
    }

}
Domain Layer
The Customer Entity
The Customer Entity models the Customer entity. We are using the annotations from the javax.persistence namespace to
annotate the domain model and set the database columns. Hibernate plays nicely with these annotations.
// Copyright (c) Philipp Wagner. All rights reserved.
// Licensed under the MIT license. See LICENSE file in the project root for full license information.

package de.bytefish.multitenancy.model;

import javax.persistence.*;

@Entity
@Table(schema = "sample", name = "customer")
public class Customer {

    @Id
    @GeneratedValue(strategy = GenerationType.IDENTITY)
    @Column(name = "customer_id")
    private Long id;

    @Column(name = "first_name")
    private String firstName;

    @Column(name = "last_name")
    private String lastName;

    protected Customer() {}

    public Customer(Long id, String firstName, String lastName) {
        this.id = id;
        this.firstName = firstName;
        this.lastName = lastName;
    }

    public Long getId() {
        return id;
    }

    public String getFirstName() {
        return firstName;
    }

    public String getLastName() {
        return lastName;
    }
}
The Customer Repository
Adding CRUD functionality is simple with Spring Boot, which provides a so called CrudRepository. You simply extend from the
CrudRepository interface and Spring automatically provides all CRUD functionality for your entity.
// Copyright (c) Philipp Wagner. All rights reserved.
// Licensed under the MIT license. See LICENSE file in the project root for full license information.

package de.bytefish.multitenancy.repositories;

import de.bytefish.multitenancy.model.Customer;
import org.springframework.data.repository.CrudRepository;

public interface ICustomerRepository extends CrudRepository<Customer, Long> {
}
The Web Layer
I am a fanboy of the Jersey framework (https://jersey.github.io/), which is easy to extend and integrates well with Spring Boot.
Extracting the Tenant Information
There are several ways to extract the tenant identifier from an incoming request. The Webservice client will send a HTTP Header
with the name X-TenantID in the example. In Jersey you can implement a ContainerRequestFilter to intercept an incoming
request and extract data from it.
The TenantNameFilter reads the X-TenantID header and stores its value in the ThreadLocalStorage.
// Copyright (c) Philipp Wagner. All rights reserved.
// Licensed under the MIT license. See LICENSE file in the project root for full license information.

package de.bytefish.multitenancy.web.filters;

import de.bytefish.multitenancy.core.ThreadLocalStorage;

import javax.ws.rs.container.ContainerRequestContext;
import javax.ws.rs.container.ContainerRequestFilter;
import javax.ws.rs.core.MultivaluedMap;
import javax.ws.rs.ext.Provider;
import java.io.IOException;

@Provider
public class TenantNameFilter implements ContainerRequestFilter {

    @Override
    public void filter(ContainerRequestContext ctx) throws IOException {

        MultivaluedMap<String, String> headers = ctx.getHeaders();

        if(headers == null) {
            return;
        }

        if(!headers.containsKey("X-TenantID")) {
            return;
        }

        String tenantName = headers.getFirst("X-TenantID");

        if(tenantName == null) {
            return;
        }

        // Set in the Thread Context of the Request:
        ThreadLocalStorage.setTenantName(tenantName);
    }
}
Data Transfer Object and Converter
You should always separate your Web Layer from the Domain Layer. In an ideal world Web Layer should only care about receiving and sending Data Transfer Objects to the consumer. It should know how to convert between the Data Transfer Object and the Domain model, so it can use the Domain repositories.
The CustomerDto Data Transfer Object uses Jackson annotations to provide the JSON mapping.
// Copyright (c) Philipp Wagner. All rights reserved.
// Licensed under the MIT license. See LICENSE file in the project root for full license information.

package de.bytefish.multitenancy.web.model;

import com.fasterxml.jackson.annotation.JsonCreator;
import com.fasterxml.jackson.annotation.JsonProperty;

public class CustomerDto {

    private final Long id;

    private final String firstName;

    private final String lastName;

    @JsonCreator
    public CustomerDto(@JsonProperty("id") Long id, @JsonProperty("firstName") String firstName, @JsonProperty("lastName") String lastName) {
        this.id = id;
        this.firstName = firstName;
        this.lastName = lastName;
    }

    @JsonProperty("id")
    public Long getId() {
        return id;
    }

    @JsonProperty("firstName")
    public String getFirstName() {
        return firstName;
    }

    @JsonProperty("lastName")
    public String getLastName() {
        return lastName;
    }
}
And the Converters class provides two methods to convert between the CustomerDto and the Customer model.
// Copyright (c) Philipp Wagner. All rights reserved.
// Licensed under the MIT license. See LICENSE file in the project root for full license information.

package de.bytefish.multitenancy.web.converter;

import de.bytefish.multitenancy.model.Customer;
import de.bytefish.multitenancy.web.model.CustomerDto;

public class Converters {

    public static CustomerDto convert(Customer source) {
        if(source == null) {
            return null;
        }

        return new CustomerDto(source.getId(), source.getFirstName(), source.getLastName());
    }

    public static Customer convert(CustomerDto source) {
        if(source == null) {
            return null;
        }

        return new Customer(source.getId(), source.getFirstName(), source.getLastName());
    }

}
Resource
Implementing the RESTful Webservice with Jersey now basically boils down to using the ICustomerRepository for querying
the database and using the Converters to convert between both representations.
// Copyright (c) Philipp Wagner. All rights reserved.
// Licensed under the MIT license. See LICENSE file in the project root for full license information.

package de.bytefish.multitenancy.web.resources;

import de.bytefish.multitenancy.model.Customer;
import de.bytefish.multitenancy.repositories.ICustomerRepository;
import de.bytefish.multitenancy.web.converter.Converters;
import de.bytefish.multitenancy.web.model.CustomerDto;
import org.springframework.beans.factory.annotation.Autowired;
import org.springframework.stereotype.Component;

import javax.annotation.security.RolesAllowed;
import javax.ws.rs.*;
import javax.ws.rs.core.MediaType;
import java.util.List;
import java.util.stream.Collectors;
import java.util.stream.StreamSupport;

@Component
@Path("/customers")
public class CustomerResource {

    private final ICustomerRepository repository;

    @Autowired
    public CustomerResource(ICustomerRepository repository) {
        this.repository = repository;
    }

    @GET
    @Produces(MediaType.APPLICATION_JSON)
    public List<CustomerDto> getAll() {
        // Return the DTO List:
        return StreamSupport.stream(repository.findAll().spliterator(), false)
                .map(Converters::convert)
                .collect(Collectors.toList());
    }

    @GET
    @Path("{id}")
    @Produces(MediaType.APPLICATION_JSON)
    public CustomerDto get(@PathParam("id") long id) {
        Customer customer = repository.findOne(id);

        // Return the DTO:
        return Converters.convert(customer);
    }

    @POST
    @Produces(MediaType.APPLICATION_JSON)
    public CustomerDto post(CustomerDto customer) {
        // Convert to the Domain Object:
        Customer source = Converters.convert(customer);

        // Store the Entity:
        Customer result = repository.save(source);

        // Return the DTO:
        return Converters.convert(result);
    }

    @DELETE
    @Path("{id}")
    @Produces(MediaType.APPLICATION_JSON)
    public void delete(@PathParam("id") long id) {
        repository.delete(id);
    }
}
Configuration
Jersey needs to be configured with the Filter and Resource. This is done by extending the ResourceConfig and registering the
TenantNameFilter and CustomerResource. I have also added two properties, which allow you to do Request tracing. They
might be handy for debugging, so uncomment them if you need.
// Copyright (c) Philipp Wagner. All rights reserved.
// Licensed under the MIT license. See LICENSE file in the project root for full license information.

package de.bytefish.multitenancy.web.configuration;


import de.bytefish.multitenancy.web.filters.TenantNameFilter;
import de.bytefish.multitenancy.web.resources.CustomerResource;
import org.glassfish.jersey.server.ResourceConfig;
import org.springframework.stereotype.Component;

/**
 * Jersey Configuration (Resources, Modules, Filters, ...)
 */
@Component
public class JerseyConfig extends ResourceConfig {

    public JerseyConfig() {

        // Register the Filters:
        register(TenantNameFilter.class);

        // Register the Resources:
        register(CustomerResource.class);

        // Uncomment to disable WADL Generation:
        //property("jersey.config.server.wadl.disableWadl", true);

        // Uncomment to add Request Tracing:
        //property("jersey.config.server.tracing.type", "ALL");
        //property("jersey.config.server.tracing.threshold", "TRACE");
    }
}
Plugging it together
Finally it is time to plug everything together using Spring Boot. All we have to do is to define a Bean for the DataSource,
and use the TenantAwareRoutingSource for routing. I have also added some sane properties for Spring JPA, so Spring doesn't
try to automatically detect the database.
All other dependencies are automatically resolved by Spring Boot.
package de.bytefish.multitenancy;

import com.zaxxer.hikari.HikariDataSource;
import de.bytefish.multitenancy.routing.TenantAwareRoutingSource;
import org.springframework.boot.autoconfigure.SpringBootApplication;
import org.springframework.boot.builder.SpringApplicationBuilder;
import org.springframework.boot.web.support.SpringBootServletInitializer;
import org.springframework.context.annotation.Bean;
import org.springframework.jdbc.datasource.lookup.AbstractRoutingDataSource;
import org.springframework.transaction.annotation.EnableTransactionManagement;

import javax.sql.DataSource;
import java.util.HashMap;
import java.util.Map;
import java.util.Properties;

@SpringBootApplication
@EnableTransactionManagement
public class SampleJerseyApplication extends SpringBootServletInitializer {

    public static void main(String[] args) {
        new SampleJerseyApplication()
                .configure(new SpringApplicationBuilder(SampleJerseyApplication.class))
                .properties(getDefaultProperties())
                .run(args);
    }


    @Bean
    public DataSource dataSource() {

        AbstractRoutingDataSource dataSource = new TenantAwareRoutingSource();

        Map<Object,Object> targetDataSources = new HashMap<>();

        targetDataSources.put("TenantOne", tenantOne());
        targetDataSources.put("TenantTwo", tenantTwo());

        dataSource.setTargetDataSources(targetDataSources);

        dataSource.afterPropertiesSet();

        return dataSource;
    }

    public DataSource tenantOne() {

        HikariDataSource dataSource = new HikariDataSource();

        dataSource.setInitializationFailTimeout(0);
        dataSource.setMaximumPoolSize(5);
        dataSource.setDataSourceClassName("org.postgresql.ds.PGSimpleDataSource");
        dataSource.addDataSourceProperty("url", "jdbc:postgresql://127.0.0.1:5432/sampledb");
        dataSource.addDataSourceProperty("user", "philipp");
        dataSource.addDataSourceProperty("password", "test_pwd");

        return dataSource;
    }

    public DataSource tenantTwo() {

        HikariDataSource dataSource = new HikariDataSource();

        dataSource.setInitializationFailTimeout(0);
        dataSource.setMaximumPoolSize(5);
        dataSource.setDataSourceClassName("org.postgresql.ds.PGSimpleDataSource");
        dataSource.addDataSourceProperty("url", "jdbc:postgresql://127.0.0.1:5432/sampledb2");
        dataSource.addDataSourceProperty("user", "philipp");
        dataSource.addDataSourceProperty("password", "test_pwd");

        return dataSource;
    }

    private static Properties getDefaultProperties() {

        Properties defaultProperties = new Properties();

        // Set sane Spring Hibernate properties:
        defaultProperties.put("spring.jpa.show-sql", "true");
        defaultProperties.put("spring.jpa.hibernate.naming.physical-strategy", "org.hibernate.boot.model.naming.PhysicalNamingStrategyStandardImpl");
        defaultProperties.put("spring.datasource.initialize", "false");

        // Prevent JPA from trying to Auto Detect the Database:
        defaultProperties.put("spring.jpa.database", "postgresql");

        // Prevent Hibernate from Automatic Changes to the DDL Schema:
        defaultProperties.put("spring.jpa.hibernate.ddl-auto", "none");

        return defaultProperties;
    }

}
Testing the Application
We start with inserting customers to the database of Tenant TenantOne:
> curl -H "X-TenantID: TenantOne" -H "Content-Type: application/json" -X POST -d "{\"firstName\" : \"Philipp\", \"lastName\" : \"Wagner\"}"  http://localhost:8080/customers

{"id":1,"firstName":"Philipp","lastName":"Wagner"}

> curl -H "X-TenantID: TenantOne" -H "Content-Type: application/json" -X POST -d "{\"firstName\" : \"Max\", \"lastName\" : \"Mustermann\"}"  http://localhost:8080/customers

{"id":2,"firstName":"Max","lastName":"Mustermann"}
Getting a list of all customers for TenantOne will now return two customers:
> curl -H "X-TenantID: TenantOne" -X GET http://localhost:8080/customers

[{"id":1,"firstName":"Philipp","lastName":"Wagner"},{"id":2,"firstName":"Max","lastName":"Mustermann"}]
While requesting a list of all customers for TenantTwo returns an empty list:
> curl -H "X-TenantID: TenantTwo" -X GET http://localhost:8080/customers

[]
We can now insert a customer into the TenantTwo database:
> curl -H "X-TenantID: TenantTwo" -H "Content-Type: application/json" -X POST -d "{\"firstName\" : \"Hans\", \"lastName\" : \"Wurst\"}"  http://localhost:8080/customers

{"id":1,"firstName":"Hans","lastName":"Wurst"}
Querying the TenantOne database still returns the two customers:
> curl -H "X-TenantID: TenantOne" -X GET http://localhost:8080/customers

[{"id":1,"firstName":"Philipp","lastName":"Wagner"},{"id":2,"firstName":"Max","lastName":"Mustermann"}]
Querying the TenantTwo database will now return the inserted customer:
> curl -H "X-TenantID: TenantTwo" -X GET http://localhost:8080/customers

[{"id":1,"firstName":"Hans","lastName":"Wurst"}]
Conclusion
It's really easy to provide multitenancy with Spring Boot. Using the AbstractRoutingDataSource makes it possible to easily
implement a Database-Per-Tenant approach for multitenancy.